How can I change the automatic Power Off setting on my Epson product?
Applies To
- Hardware:Expression Home, Premium, and Photo Series printers and All-In-Ones without fax capability.
-
Related Articles:
- KA-01047 (opening the Devices and Printers folder in Microsoft Windows)
Description
Due to Epson's environmental commitments, some products are enabled by default to automatically power off after four hours of inactivity. This can be changed to a different time setting, or disabled completely.
Note: Any increase to this setting affects the product's energy efficiency — please consider the environment before making a change.
Solution
Depending on your printer model, options to change the automatic Power Off setting may be available either through the printer driver or the printer's control panel.
As a general rule, printers without an LCD control panel can be configured through the printer driver, while printers with an LCD control panel must be configured directly from the printer's control panel.
Windows 11
For other versions of Windows (such as Windows 10, 8, or 7), open the Devices and Printers window. If you need assistance with this step, refer to KA-01047 .
To access your printer settings in Windows 11:
- Start with the printer powered on and connected to the computer.
- Select Start.
- Go to Settings > Bluetooth & devices > Printers & scanners.
- Select your Epson Printer (e.g. ET‑1910).
- Select Printing Preferences.
-
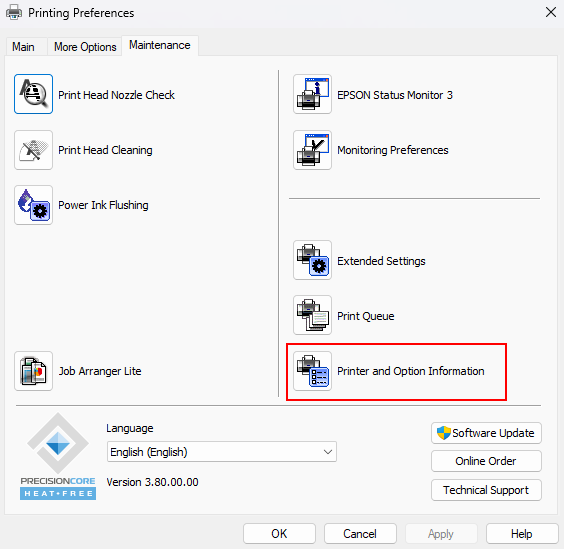
Click the Maintenance tab, then click Printer and Option Information.
-
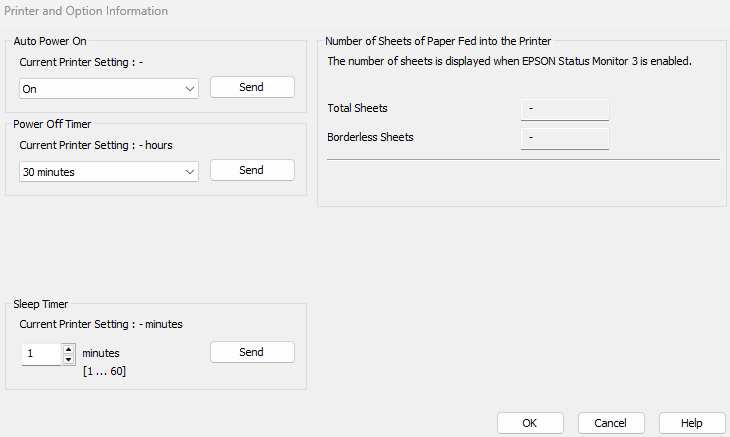
Select your preferred Power Off Timer setting: Off, 30 Minutes, 1 hour, 2 hours, 4 hours, 8 hours, or 12 hours. Press Send for each option once value has changed.
- Click OK.
macOS
- Open the Apple menu and choose System Settings (or System Preferences in older macOS versions).
- Select Printers & Scanners (or Print & Scan / Print & Fax).
- Choose your Epson Printer (e.g., ET‑1810) from the list.
-
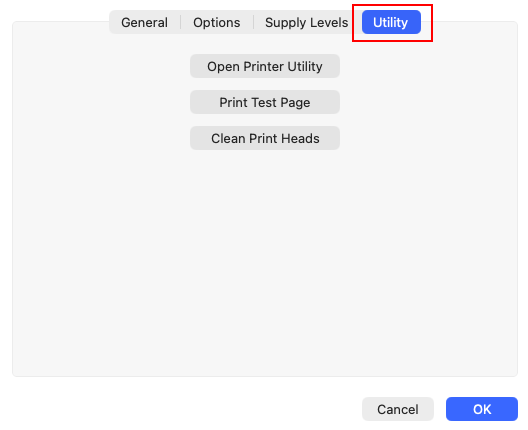
Click Options & Supplies, then go to the Utility tab.
-
Click Open Printer Utility to access the Epson maintenance tools.
-
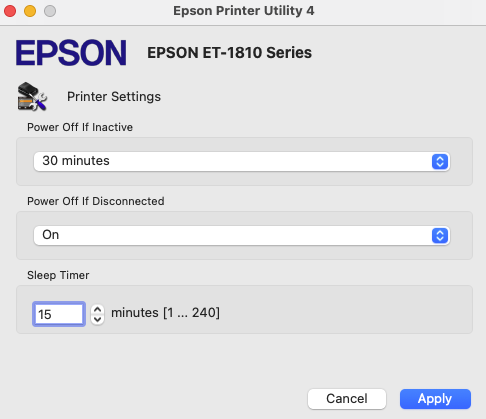
Click Printer Settings.

-
Select your preferred Power Off Timer setting: Off, 30 Minutes, 1 hour, 2 hours, 4 hours, 8 hours, or 12 hours.
- Click Apply.
Using the Printer's Control Panel
For model-specific instructions, refer to your printer's user guide. Guidance on locating your user manual can be found in KA-02031: How to find my products user guide
The steps below provide a general guide for changing the automatic Power Off setting:
- Enter Setup mode from the Home menu.
- Select Printer Setup.
- Select Power Off Timer.
- Select your preferred setting: Off, 30 Minutes, 1 hour, 2 hours, 4 hours, 8 hours, or 12 hours.