Pro Displays: How do I configure multiple projectors to project a single blended image?
Relates to:
- EB-L1000U/1100U/1105U/1300U/1405U/1490U/1495U Series
- EB-L1500UH/1505UH/1710S/1715S/1750U/1755U Series
- EB-L12000Q/L20000U Series
- EB-L25000U/L30000U Series
- Multi-Projection
- Tiling
- Screen Matching
- Edge Blending
- Black Level Adjustments
Multi-Projection

Within the Professional Displays series, it is important to have flexibility with projection whether the intent is for rental or fixed installation.
EPSON have provided many in-built functions on the Professional Display series of projection to assist with many fundamentals of single or multi-projection requirements.
Typically in this market at this current time, projectors are usually seen as a "dummy" endpoint terminal, where most of the color and calibrations are adjusted using third-party equipment and/or software. Having these functions onboard is very useful, as this reduces the amount of different equipment required to create projection mapping type effects
Setting up Multi-Projection
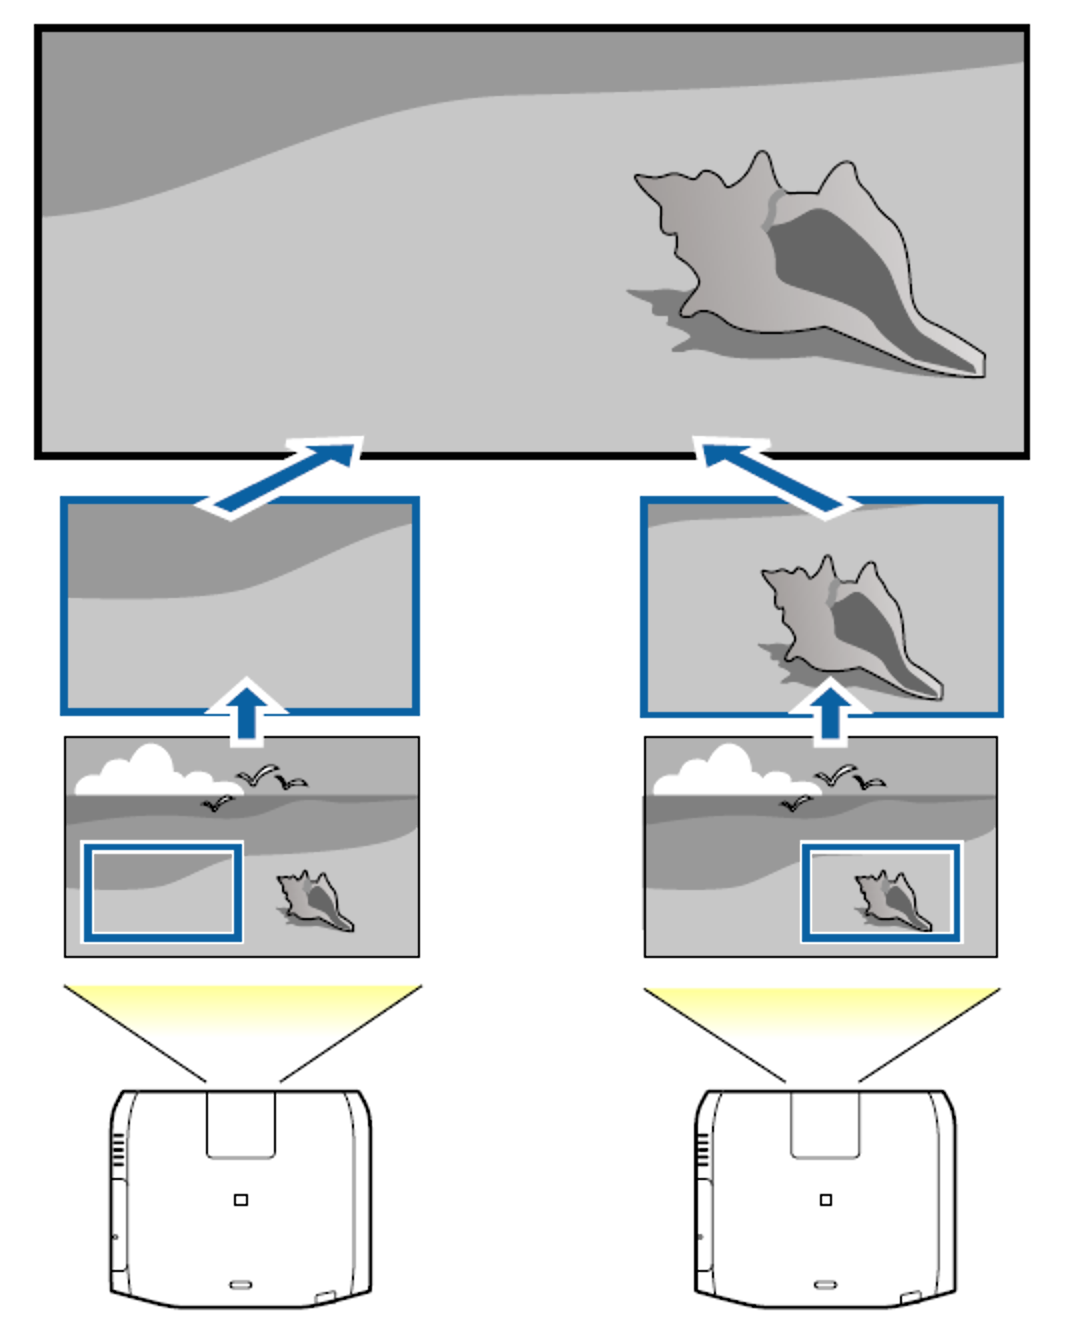
You can setup multiple projectors to project one large and/or wide image.
You can adjust the difference of brighntess and color tone between each projected image to create one seamless screen.
|
|
This article is for recommended guidance only, methods of setup can vary depending on experience and certain functions may not necessarily be needed. |
Initial Setup
Images from multiple projectors can be automatically adjusted to match the settings on the projector that is set as the master projector (e.g. Screen Matching). However, please note that the brightness of one projector may be lower than another, the brightness will automatically be adjusted according to the least bright projector. It is recommended that the projector that is selected as the 'Master' projector matches the colour and brightness required for the multi-projection setup, taking into account the least brightest projector.
The below is a summary of each step in the process of creating a multi-projection image. For more detailed information move to Tiling: Arranging the Layout.
-
When you want the image to be as bright as possible:
Set Light Source Mode for all projectors to Normal. You can also set Light Source Mode to Custom, and Brightness Level to 100%.
-
When you want to match a specific brightness:
Set Light Source Mode to Custom for the projector with the darkest projected image, and then adjust Brightness Level to the brightness you want to use. Also, you can set this projector as the master projector.
Settings - Brightness Settings - Light Source Mode - Brightness Level
Advanced Preparation
- Connect all projectors to a network hub using LAN cables.
- Turn on the master projector.
- Set the ID for the master projector and the remote control.
- Turn on all remaining projectors.
-
Depending on the network hub, set the DHCP to On for all projectors or check that IP addresses have been assigned. (Or setup a static IP address for each unit).
Network - Network Configuration - Wired LAN - IP Settings
-
Make sure that Sleep Mode is set to Off so that the projector does not turn off while performing adjustments.
Extended - Operation - Sleep Mode
Adjusting the Projected Position
- Adjust the position (angle) of the projector.
- Adjust the arrangement of the images using the Tiling function.
Adjusting the Projected Image
- Adjust the aspect ratio of the images.
- Adjust the lens shift.
- Adjust the zoom and focus.
- Adjust small differences in the images.
- Adjust the edges of the images.
- Adjust the brightness and tint of the images.
- Select and arrange the sections of the images
Tiling: Arranging the Layout
Project the same image from multiple projectors to create one large image.
You can project by using up to nine projectors

|
Before performing tiling, adjust the projected image so that it is a rectangle. Also, adjust the size and focus of the images. |
Performing Automatic Tiling
This section explains how to select the projector being used in Projector Grouping, and then automatically configure the images being projected.
|
Location setup is performed using the inbuilt cameras at the front of the projector. Do not block the camera or the projected images. |
- Press the Menu button while projecting.
- Select Multi-Projection from Extended, and then press the Enter button.
- Select Projector Grouping, and then press the Enter button.
-
Select the projectors that will be used for tiling, and then press the Enter button.

-
Select the projectors you want to use to enter a checkmark.
Select Refresh to update the list. Select Sort to sort the projector order.
- Select Set, and then press the Enter button.
-
Select the projectors you want to use to enter a checkmark.
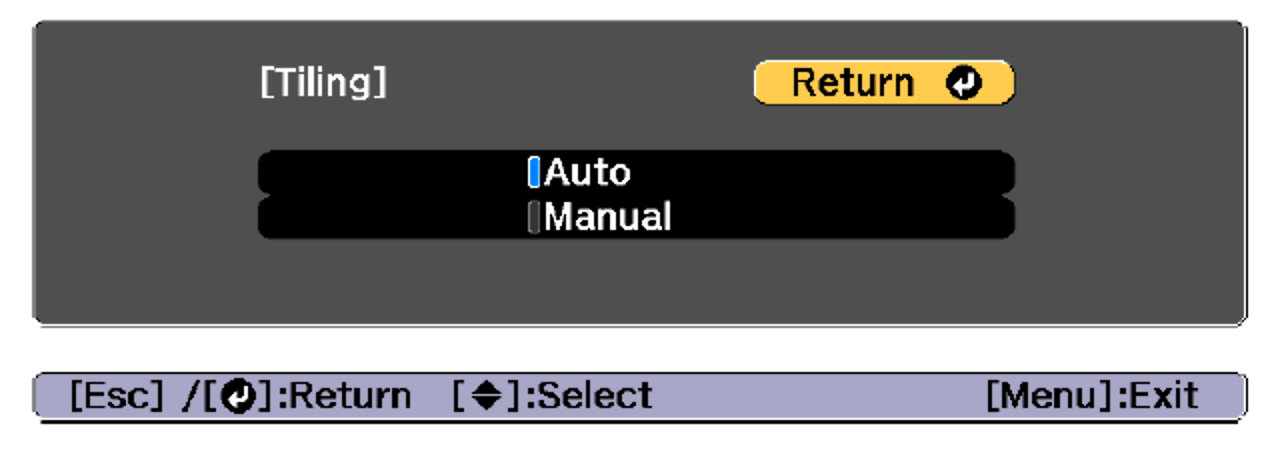
- Select Tiling, and then press the Enter button.
- Select Tiling. Select Auto, and then press the Esc button.
-
Select Location Setup, and then press the Enter button.
The image will be positioned automatically.
When the message "Assign IDs to projectors that have been located. Do you want to continue?" is displayed, select Yes.
When setup is complete, the following screen is displayed
 Tip:
Tip:If the image is not located correctly, select Manual in step 6, and then follow the steps below to locate the image manually.
- Set Row and Column in Layout.
- Select Set, and then press the Enter button.
- Select the location in Location Setup, and then press the Enter button.
- Repeat step (3) to reposition the location of all projectors.
- Select Set, and then press the Enter button.
-
Input the image signal to display the image.
When tiling is complete, adjust any positional gaps and the tint of the projected images.
 Important:
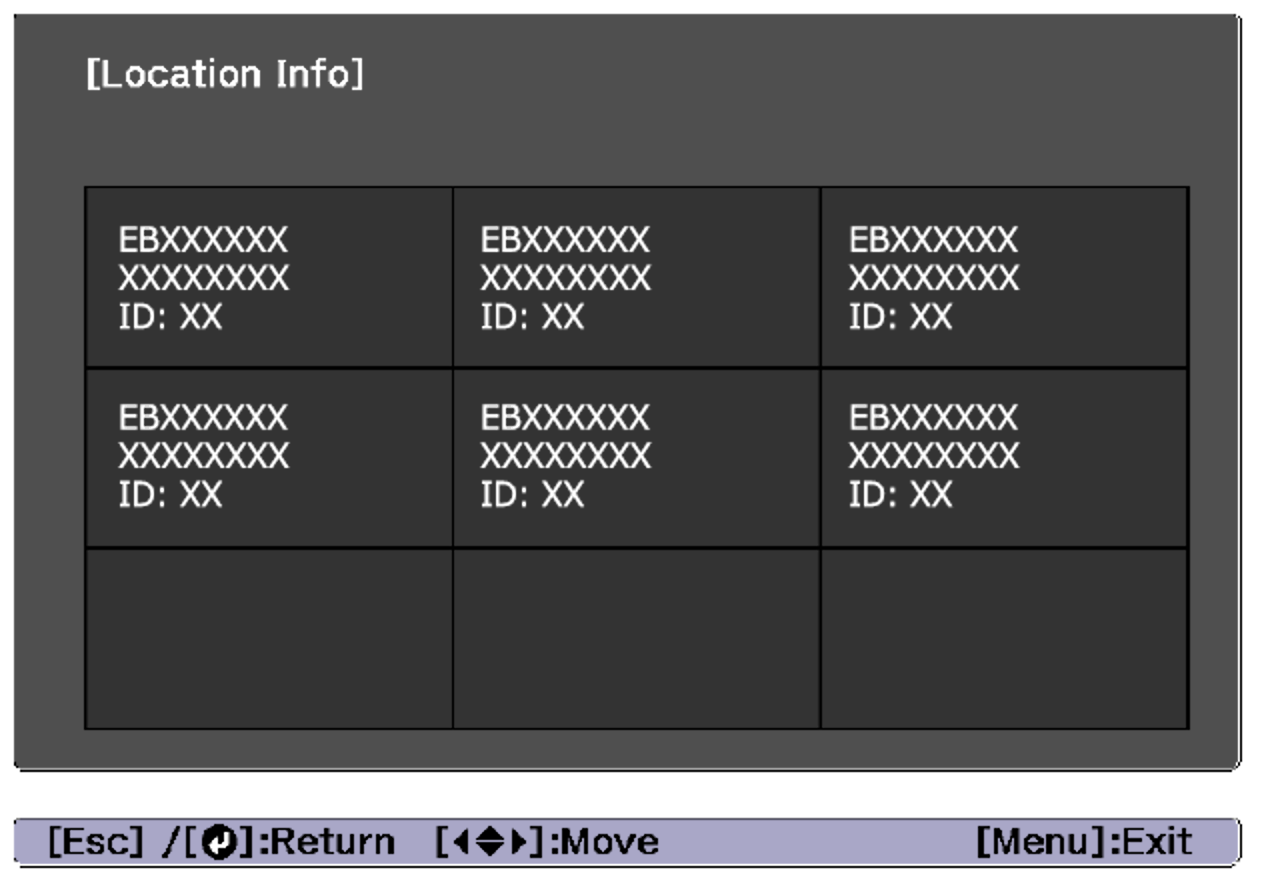
- After tiling is complete, do not change the IP addresses ot projector names of the projectors, otherwise the image will not be adjusted automatically.
- After tiling is complete, you can set each projector with one remote control. Select the projector ID for the projector you want to set with the remote control. You can check the projector ID in Tiling -> Location Info.
Performing Manual Tiling
This section explains how to perform location settings for the image manually without performing Projector Grouping.
- Press the Menu button while projecting.
- Select Multi-Projection from Extended, and then press the Enter button.
- Select Tiling, and then press the Enter button.
-
Select Layout, and then press the Enter button.
- Set the number of projectors in Row and Column.
- Select Set, and then press the Enter button.
- Repeat steps 1 to 4 for each projector to be used for tiling.
-
Select Location Setup, and then press the Enter button.
-
Set the positions of the projected images in Row and Column Order.
Row Order: Place screens from top to bottom in the order of 1, 2, 3.
Column Order: Place screens from left to right in the order of A, B, C.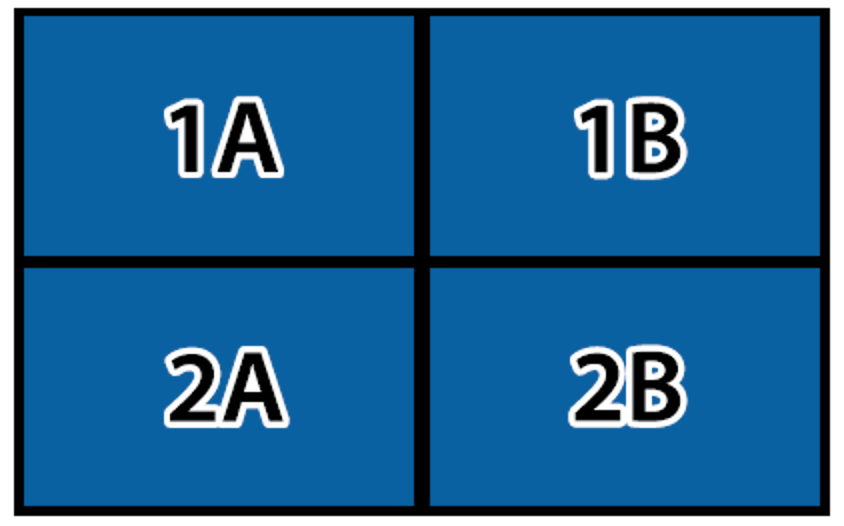
- Select Set, and then press the Enter button.
-
Set the positions of the projected images in Row and Column Order.
- Repeat step 6 for each projector.
-
Input the image signal to display the image.
When tiling is complete, adjust any positional gaps and then tint of the projected images.
Screen Matching
Adjust the tint and brightness for multiple projectors.
When projectors are connected to a network, the tint and brightness for multiple projectors are auto adjusted based on the master projector's adjustment values.
When projectors are not connected to a network, or if auto adjustment does not work, you can adjust the tint and brightness for all projectors manually.
|
Operating conditions for auto adjustment functions
The auto adjustment functions for Screen Matching are enabled when the following conditions are met.
|
- The screen surface is flat and not skewed or warped.
- Using a matte white diffusion screen.
- The projection size is 80 to 200 inches.
- The projected image after tiling is rectangular.
- All projected images are lined up with no gaps (We recommend using 15 to 45% as the width of overlapping images).
- The projector is setup parallel to the projection surface.
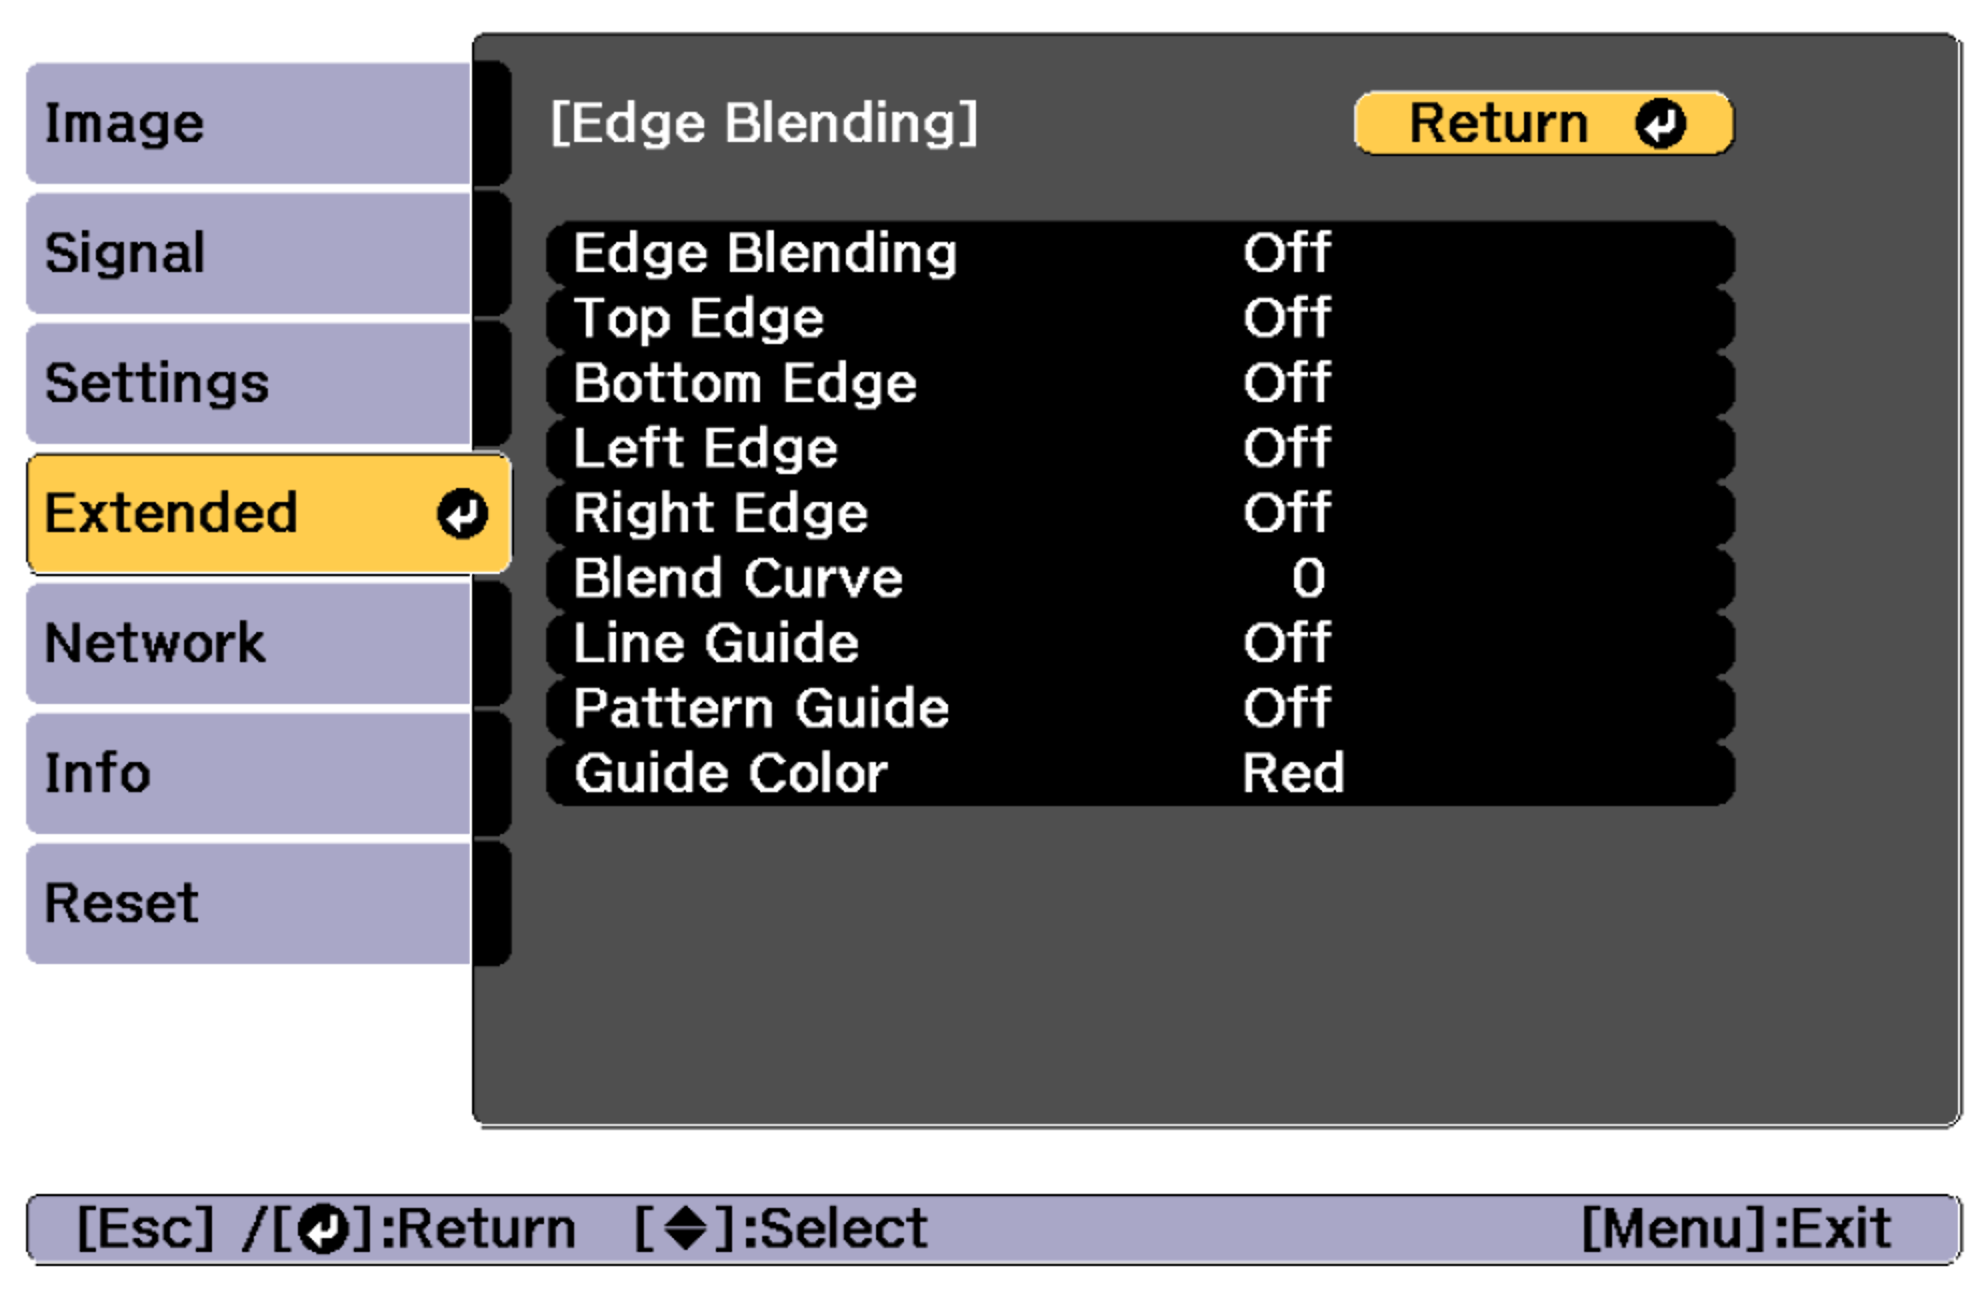
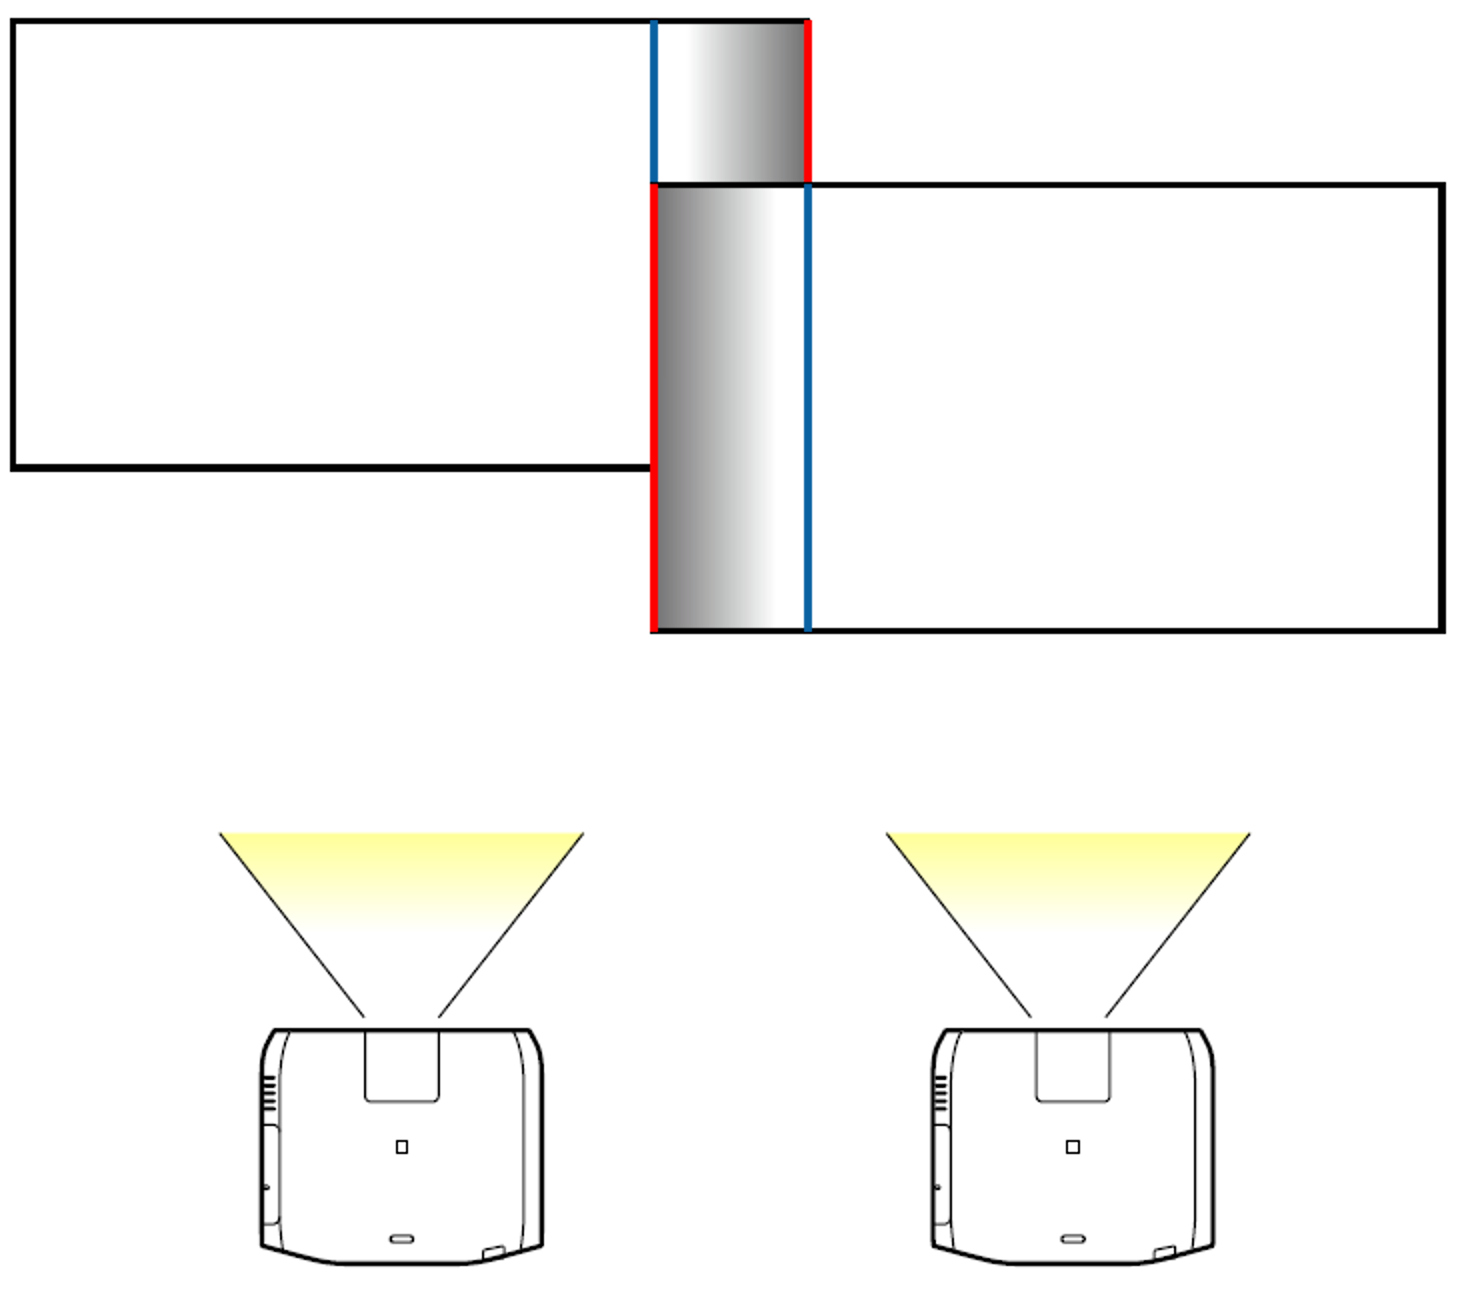
Edge Blending
You can fine tune the overlapping areas to make a seamless screen
|
Before setting up edge blending and in order to increase the precision when performing adjustments, ensure the Color Mode is set to Multi-Projection. Press the Color Mode button from the remote, then select Multi-Projection |
- Press the Menu button while projecting.
- Select Multi-Projection from Extended.
-
Select Edge Blending, and then press the Enter button.
The following screen will be displayed.
-
Turn on Edge Blending.
- Select Edge Blending, and then press the Enter button.
- Select On, and then press the Enter button.
- Press the Esc button.
-
Set Line Guide to On.
Tip:
If the guide is not clear, you can change the color of the guide in Guide Color menu.
- Select Line Guide, and then press the Enter button.
- Select On, and then press the Enter button.
- Press the Esc button.
-
Set Pattern Guide to On.
- Select Pattern Guide, and then press the Enter button.
- Select On, and then press the Enter button.
- Press the Esc button.
-
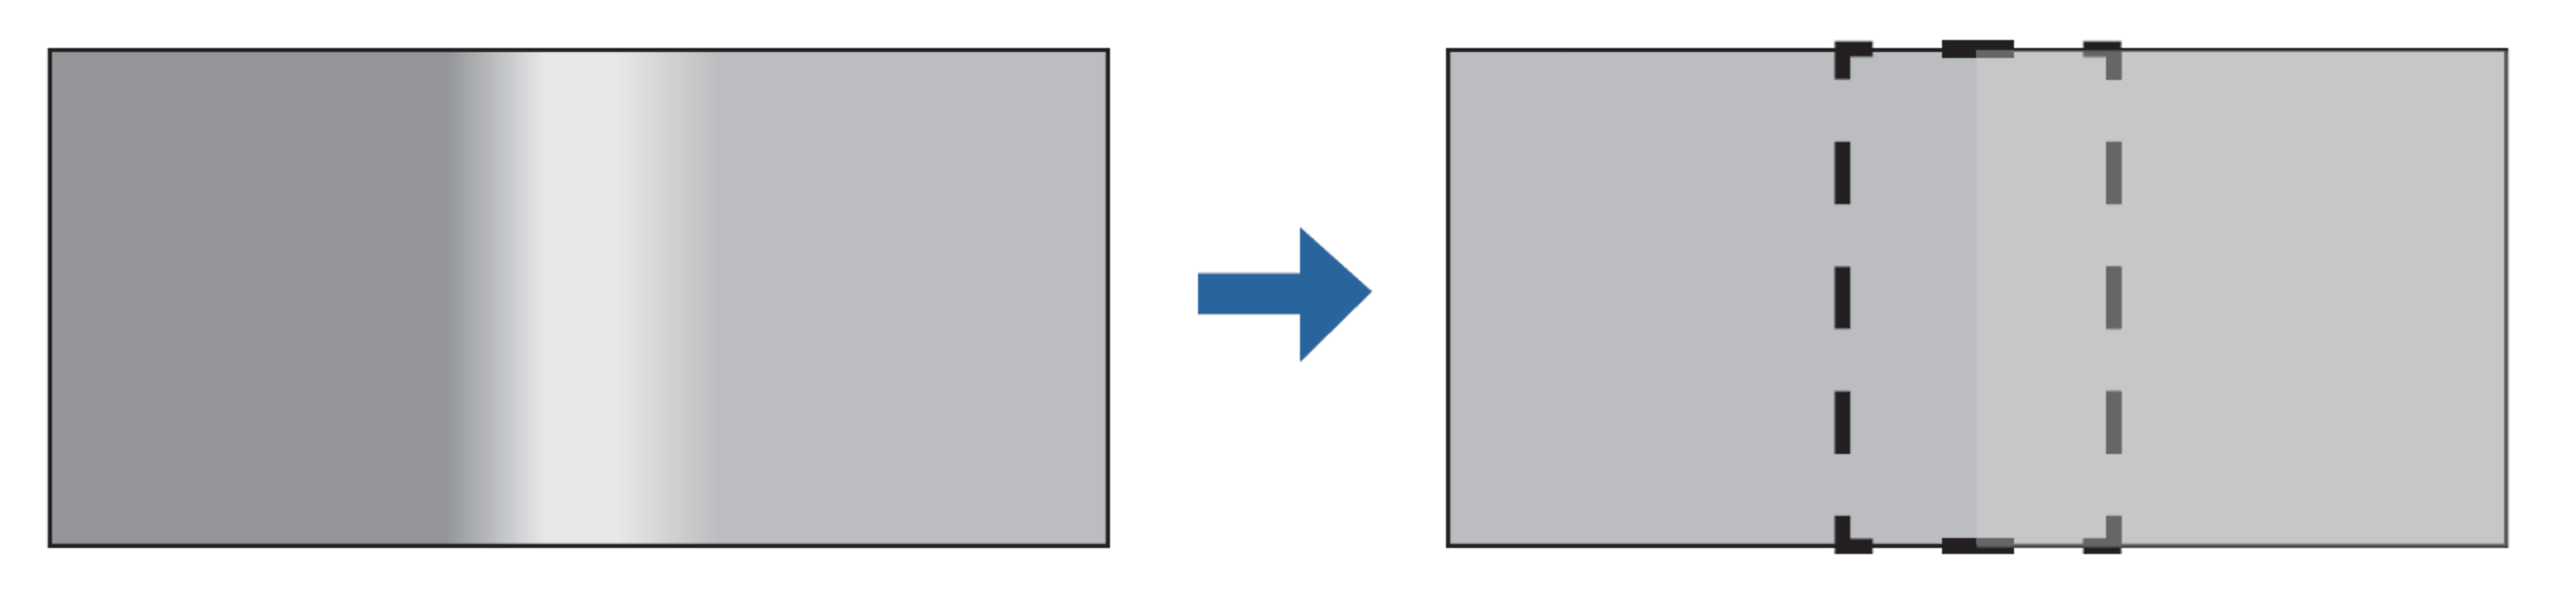
Set Top Edge, Bottom Edge, Left Edge, or Right Edge according to the parts of the image that are overlapped.
The following shows how to set screen (1) as an example.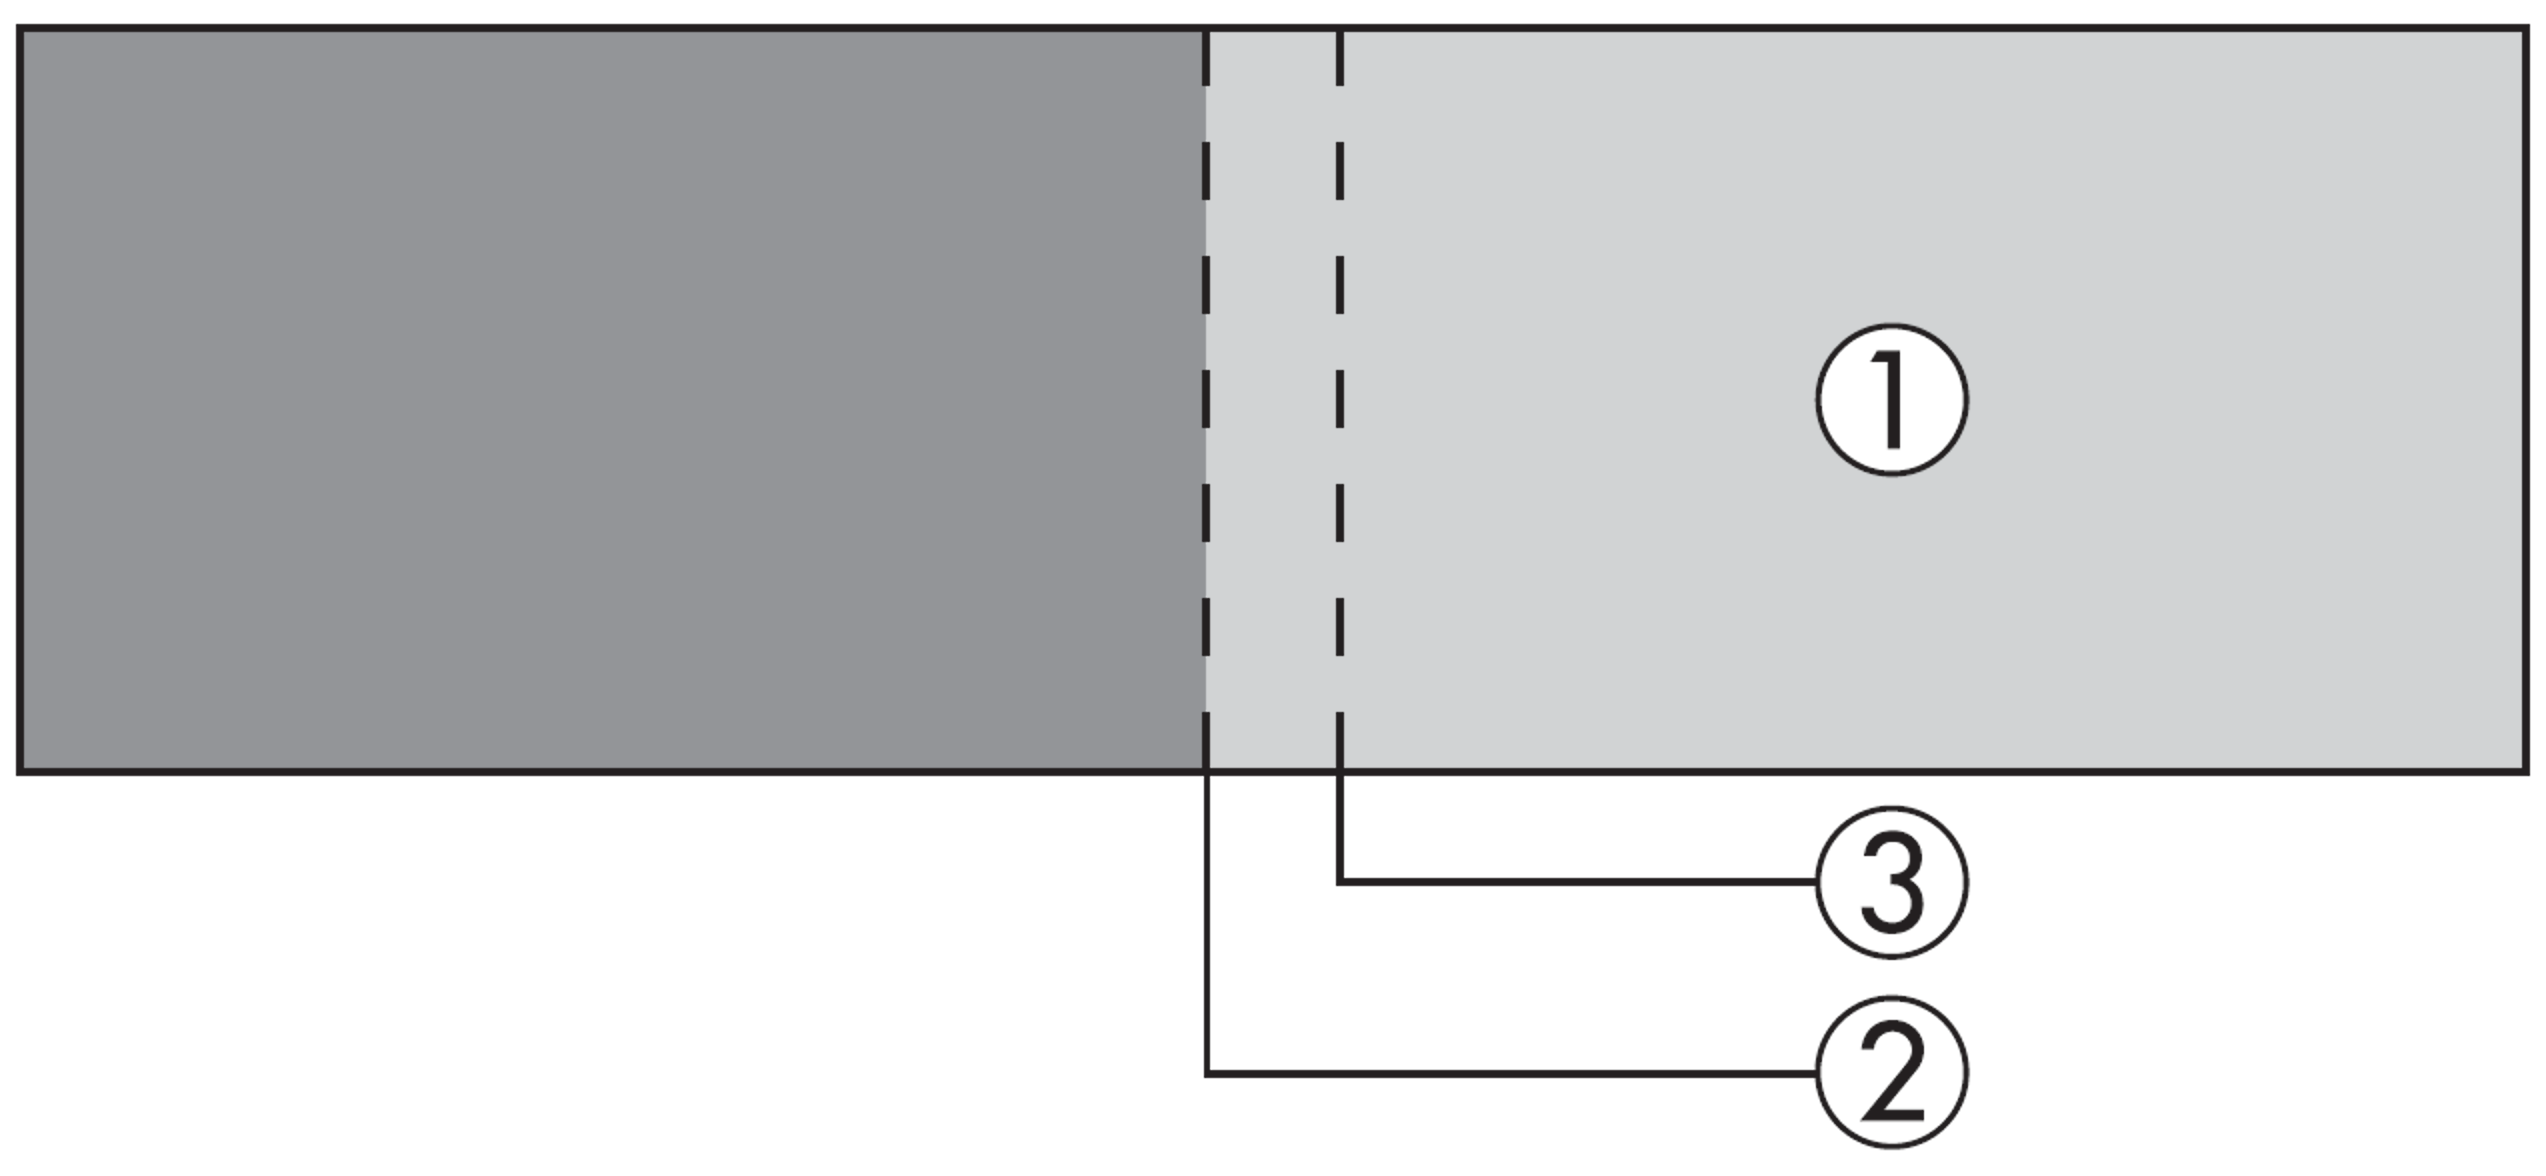
In the example above, you need to adjust the Left Edge because you can see the overlapping areas on the left side of the image (1).
- Select Left Edge, and then press the Enter button.
- Select Blending, and then press the Enter button.
- Select On, and then press the Enter button.
- Press the Esc button.
- In Blend Start Position, align the blending start position with the edge (2) of the image.
- Press the Esc button.
-
In Blend Range, adjust the range (3) to be shaded.
For better accuracy we recommend that the value of the overlapped range is inline with the pattern guide. This will make it easier when setting up the complete blend.
- Press the Esc button.
-
Set Blend Curve.
- Select Blend Curve, and then press the Enter button.
- Select the amount of shading from 0 to 15, and then press the Enter button.
- Press the Esc button.
- After the settings are complete, set Line Guide and Pattern Guide to Off to finish.
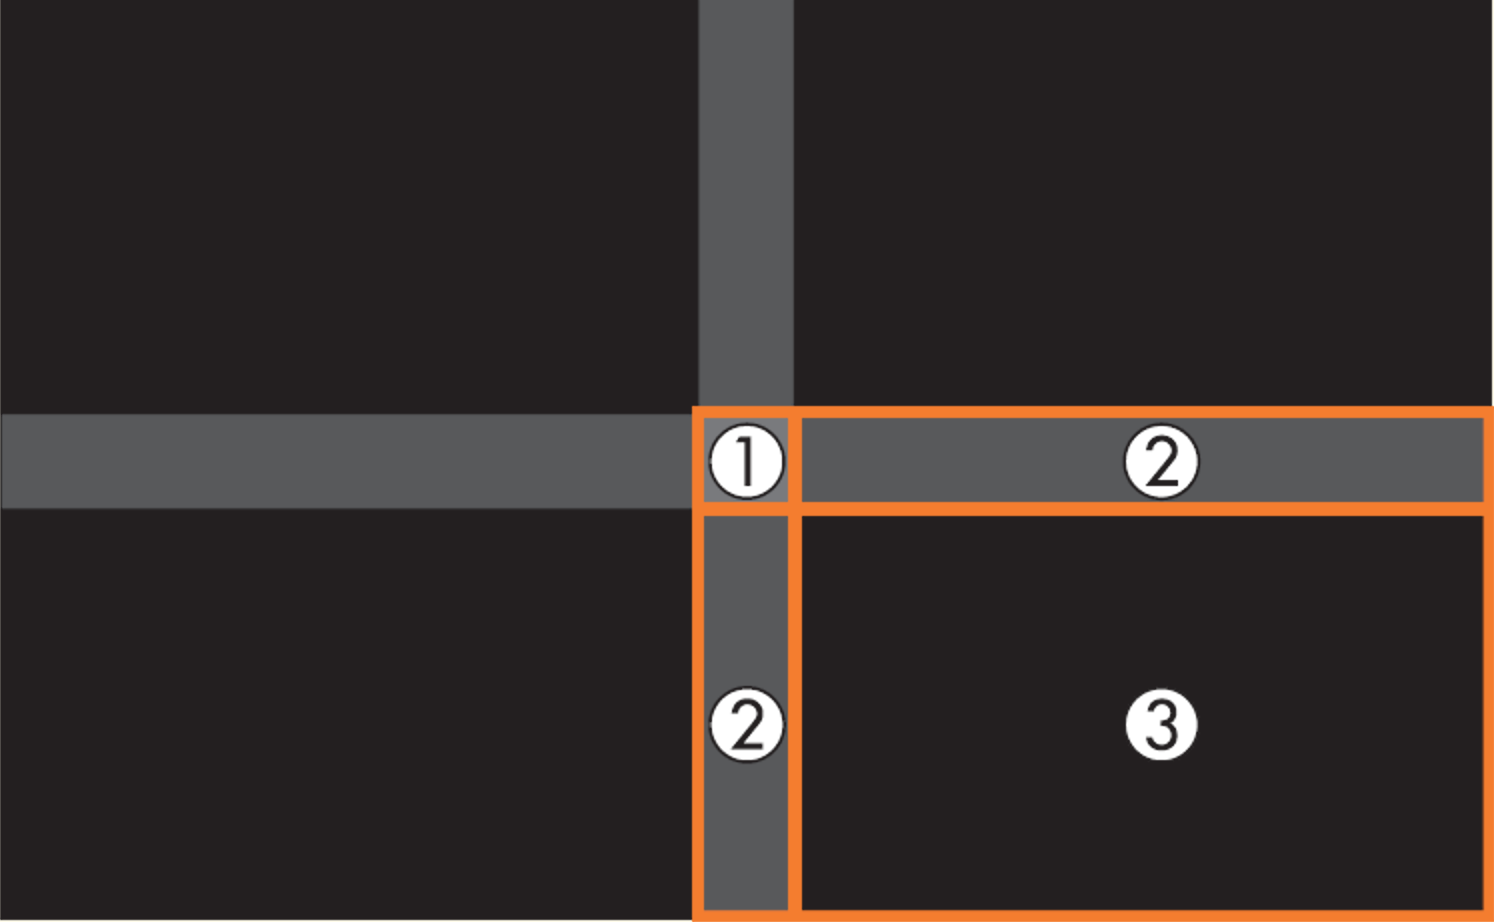
Black Level Adjustment
When two or more edge-blended projectors project a black image, the areas in which there is overlap will be more noticeable. The black level adjustment function will allow you to match the brightness and tone with the areas where the image does not overlap, therefore making the difference less noticeable.

|
- Select Black Level from Multi-Projection, and then press the Enter button.
-
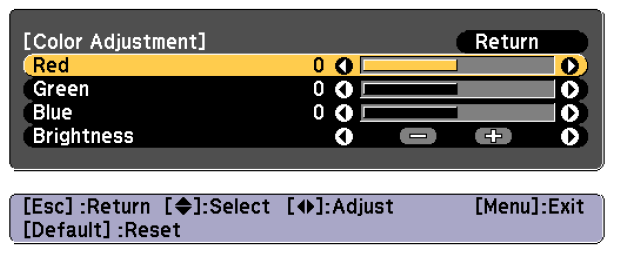
Select Color Adjustment, and then press the Enter button.
The areas are displayed based on the settings for Top Edge/Bottom Edge/Right Edge/Left Edge.
-
Select the area you want to adjust, and then press the Enter button.
The selected area is displayed in orange
 Note:
Note:When multiple screens are overlapping, adjust based on the area with the most overlap (the brightest area). In the illustration below, first align (2) with (1), and then adjust so that (3) aligns with (2).
-
Adjust the black tone and brightness.
-
Repeat steps 3 and 4 as needed to adjust any remaining parts.

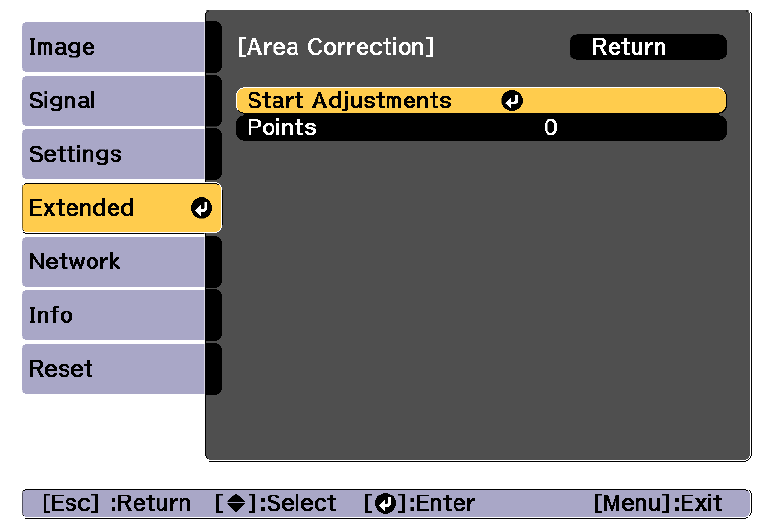
After this, if the tone for some areas do not match, adjust them by Area Correction.
- Press the [Esc] button to return to the screen displayed in step 2.
-
Select Area Correction, and then press the Enter button.

-
Select Start Adjustments and then press the Enter button.
Boundary lines that indicate areas where images overlap will be displayed. The boundary lines are displayed based on the settings for Top Edge / Bottom Edge / Right Edge / Left Edge.
-
Use the arrow buttons on the remote to select the boundary line of the area you want to adjust.
The selected line is displayed in orange.

-
Press the Enter button to confirm the selection.

- Use the arrow buttons on the remote to adjust the boundary line positions, and then press the Enter button.
-
Press the arrow buttons to select the point you want to move, and then press the Enter button.
The selected point is displayed in orange

-
Press the arrow buttons on the remote to move the selected point.
To move an additional point, press the [Esc] button to return to step 12, then repeat steps 12 and 13.
To adjust another boundary line, press the [Esc] button until the screen for selecting a boundary line from step 9 is displayed.
Note:To return Black level to its default value, press the [Esc] button to return to the screen from step 7, select [Reset], and then press the Enter button.
- To complete the adjustment, press the [Menu] button.
Displaying a Scaled Image
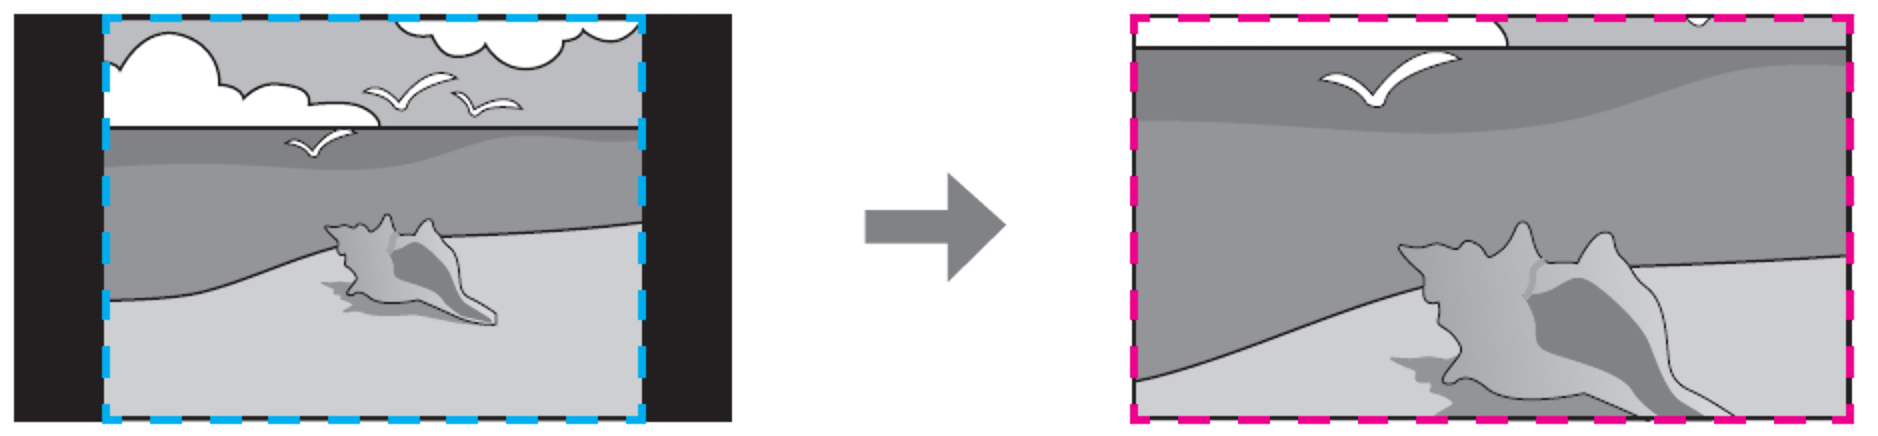
The scaled image function of this series allows a single image to be split into segments and then displayed as one full image across multiple projectors.
This requires the use of any of the following:
-
A PC capable of providing multiple graphical outputs.

-
An input switch or splitter that is able to repeat the input image across multiple outputs.

Scaled Images Setup
|
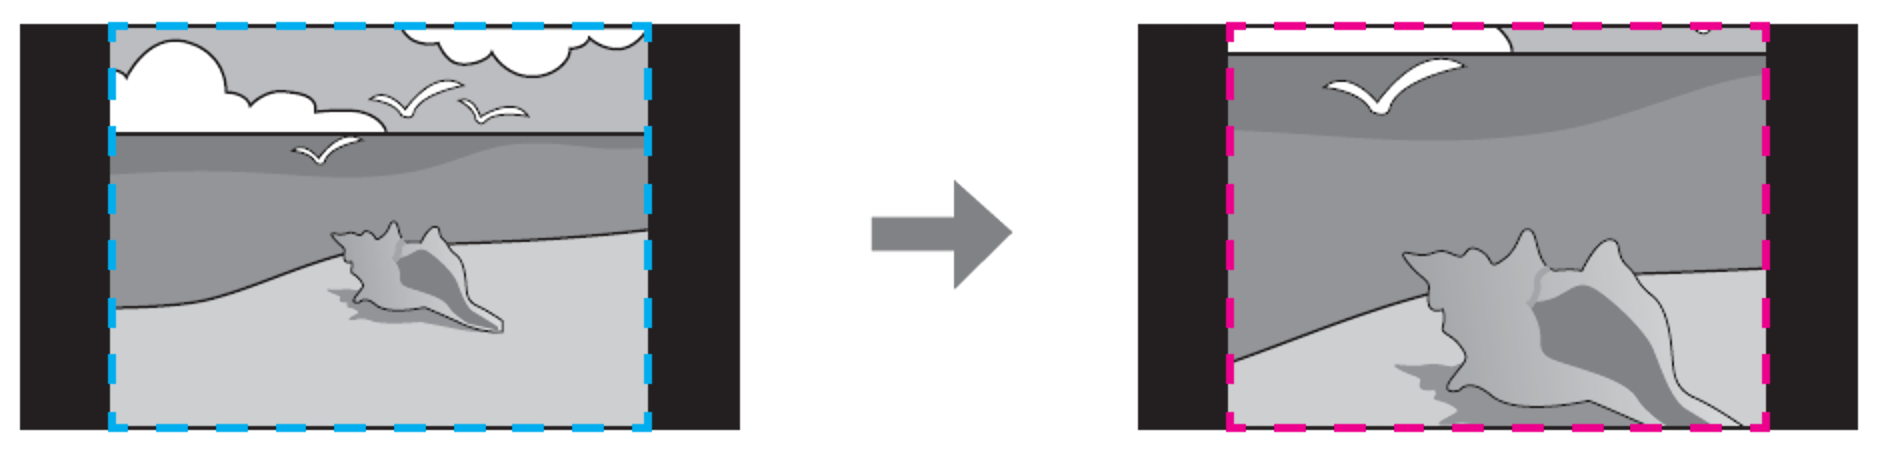
You can check the displayed area after clipping for the entire image from Clip Range. |
- Project the image, and then press the [Menu] button.
-
Select Multi-Projection from Extended.
Note:
You can also perform the same operation from Scale in Signal
- Select Scale, and then press the Enter button.
-
Turn on Scale.
- Select Scale, and then press the Enter button.
-
Select Auto or Manual, and then press the Enter button.
Auto: Automatically adjusts the clipped area according to the adjustment values in Edge Blending and Tiling. You do not need to perform any steps after step 6.
Manual: Allows you to adjust the clipped area manually.
- Press the [Esc] button to return to the previous screen.
If auto adjustment does not work for the clipped image, adjust the aspect ratio, and then select Auto.
-
Set Scale Mode.
- Select Scale Mode, and then press the Enter button.
-
Select Zoom Display or Full Display, and then press the Enter button.
Zoom Display: Adjusts according to the image currently displayed.
Enlarge
Move

Full Display: Adjusts according to the projector's panel size (the maximum area in which an image can be displayed).
Enlarge
Move

- Press the [Esc] button to return to the previous screen.
-
Adjust the scale.
Select the adjustment method with the [UP]/[DOWN] buttons, then adjust using the [LEFT]/[RIGHT] buttons.
-+: Enlarges or reduces an image horizontally and vertically at the same time.
Scale Vertically: Enlarges or reduces an image vertically.
Scale Horizontally: Enlarges or reduces an image horizontally.
-
The image is clipped and adjusted.
- Select Clip Adjustment, and then press the [ENTER] button. If you select Clip Range, the range and coordinates of the image that the projector will project is displayed.
-
Use the [UP], [DOWN], [LEFT], and [RIGHT] buttons to scroll the image.
Adjust the coordinates and size of each image while viewing the screen.
- Press the [Menu] button to finish making settings.