How do I use the Perfection V750 Pro or V850 Pro Fluid Mount Accessory?
- Perfection V750 Pro
- Perfection V850
- Fluid Mount Accessory
The Epson Fluid Mount Accessory lets you take full advantage of your scanner's capability for high-resolution imaging. When used with a commercial mounting fluid, it holds the film flat to maintain a consistently sharp focus, helps eliminate Newton rings, reduces grain, and reduces the appearance of scratches on silver-based negatives.
The Epson Fluid Mount Accessory is available, from Epson, to owners of the Perfection V750 Pro/V850. For Perfection V700 Photo owners, it is an optional accessory - please contact Epson for further details.
How to use the Fluid Mount Accessory
In cases where film holders are not the best solutions for film scanning, the fluid mount accessory offers:
- Scratch removal from film not supported by DIGITAL ICE™ technology such as black & white film.
- Easy scanning of film that won't fit into standard film holders.
- Reduction of grain and prevention of Newton rings from curved film.

Fluid Mount Accessory
To use the Epson Fluid Mount, you need to obtain these commercially available supplies: scanner mounting fluid and scanner mounting film (clear Mylar® polyester film). See the 'Related articles' section for information on fluid and film supplies for your scanner.
|
Follow these steps to scan film with your Epson fluid mount:
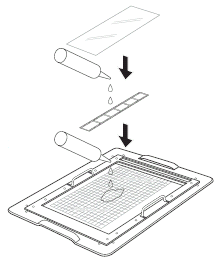
- Cut a sheet of clear mounting film to fit within the frame of the fluid mount tray. The sheet must be large enough to cover the film you're going to scan.
- Set the Epson fluid mount guide on your work table. Then place the fluid mount tray on top of the guide. Use the handles to place the tray on the guide.
 Note:
Note:Use the grid to align your film while mounting it on the tray. The grid indicates the optimal area for 6400 dpi scanning.
- Place a drop or two of mounting fluid on the glass tray where you want to mount your film, working quickly so the fluid doesn't evaporate. Only a few drops are needed to mount a six-frame 35mm film strip.
- Place your film over the wetted area, using the grid to align your film.
- Apply a small amount of fluid to the top of your film.
- Place the clear mounting film (cut to fit the fluid mounting tray) on top. Use a lint-free cloth or gloved hands to press outward toward the edges to remove trapped air bubbles.
- Make sure the cover cable is connected to the scanner's OPTION port.
Note:
Before connecting or disconnecting the cover cable, turn off the scanner using its power button.
- Open the scanner cover and gently slide up the document mat to remove it. Also make sure the transparency unit transportation lock is unlocked.
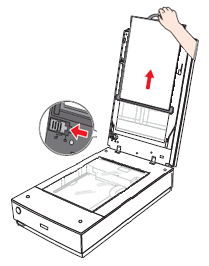
- Lift the fluid mount tray off the guide and place it on the scanner with the narrow window of the tray toward the back of the scanner.
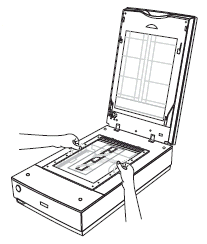
- Close the scanner cover and open the EPSON Scan software.
- Scan in the Professional Mode of EPSON Scan, selecting Film (with Film Holder) as the Document Type.
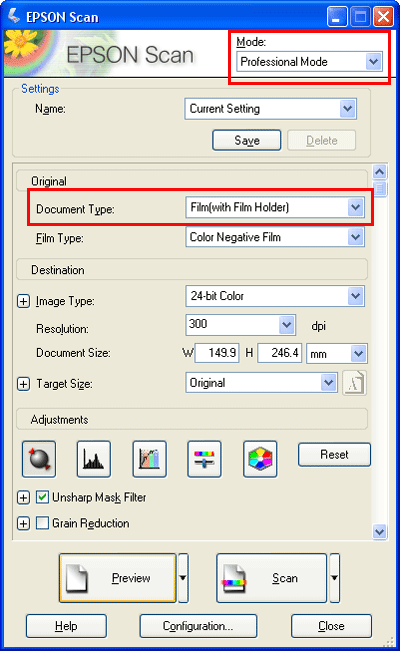
- Make the following settings according to your film type and needs:
- Film Type
- Image Type
- Resolution
Note:You can select up to 6400 dpi for the best image quality.
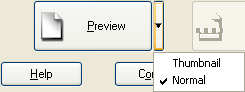
- Click the arrow next to the Preview button and make sure Normal is selected as the preview type. Then click the Preview button to preview your images.
- EPSON Scan prescans your images and displays them in the normal Preview window.
- Select the scan area for each photo individually, being careful to select only the image itself and not the surrounding area. To select your scan area, draw a marquee that marks the edges of the scan area on each image. You can move and resize the marquees to change the scan areas as necessary. Make any desired image adjustments before scanning. See your scanner's User Guide for more information.
- When you have finished adjusting the scan areas and making any further adjustments and settings, click the Scan button to scan your images.