How to adjust the medium format film size setting in Epson Scan so the image is not cropped
- Windows and macOS & Mac OS X
- EPSON Scan & Epson Scan 2
- Scanning film, cropping, clipping, or missing sections of images
- Models:
- Perfection 4490
- Perfection V500
- Perfection V550
- Perfection V600
- Perfection V700
- Perfection V750 Pro
- Perfection V800
- Perfection V850 Pro
When scanning film or photos, it is important to ensure the settings you make in Epson Scan are appropriate for the type and size of original (film, photo, document) that you are scanning.
If you wish to scan in the Thumbnail preview mode, it is important to select the specific format size when scanning medium format film types (also known as 'brownies'). This ensures that the software will detect and read the correct scan area size of the images you want to scan. Otherwise, the scanned images may be cropped to a smaller scan area, only capturing part of the image.
There are two types of preview mode:
- Normal preview displays your previewed images in their entirety. You must select the scan area and make any image quality adjustments manually.
- Thumbnail preview displays your previewed images as thumbnails. Epson Scan automatically locates the edges of your scan area and applies automatic exposure settings to the images. Thumbnail is the default preview type when scanning film or slides.
For instructions on viewing the thumbnail preview of images from medium format film expand the relevant section below for the version of Epson Scan you are using:
Epson Scan
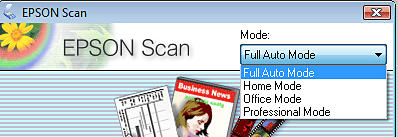
- Open EPSON Scan in Home or Professional Mode.
 Note:
Note:You cannot use Full Auto Mode to scan medium format film.
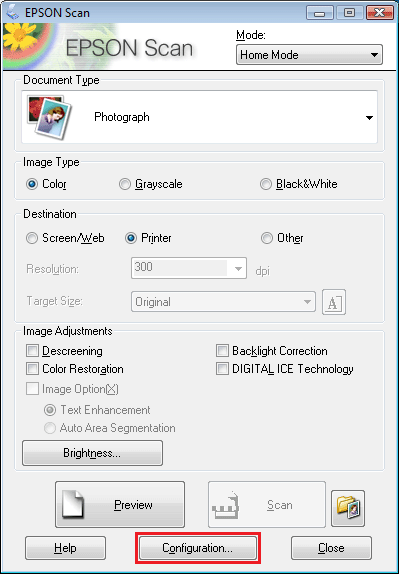
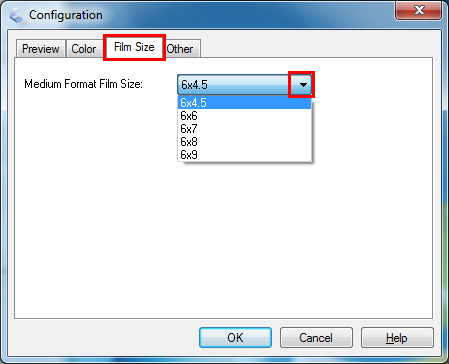
- Click the Configuration button at the bottom of the window, then click the Film Size tab, and select the correct size as the Medium Format Film Size setting.
The medium format choices are as follows (inches): 6x4.5, 6x6, 6x7, 6x8, 6x9.
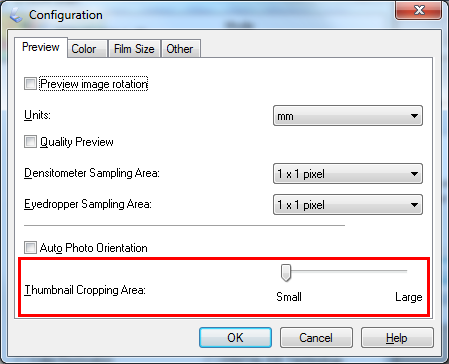
If necessary, you can also adjust the amount of clipping that occurs in the Thumbnail mode, via the Preview tab in the Configuration window:
-
Do one of the following to select your document type:
- Home mode:
Click the arrow to open the Document Type list and select the type of film or slide you are scanning. Select Color Negative Film, B&W Negative Film, or Positive Film for a film strip, or Positive Film for slides. Then click the Color, Grayscale, or Black&White button to select the colors in the original, if necessary.
- Professional mode:
Click the arrow to open the Document Type list and select Film (with Film Holder) (for scanning a film or slide). Then click the arrow in the Film Type list and select Color Negative Film, B&W Negative Film, or Positive Film for a film strip, or Positive Film for slides.
- Home mode:
- Select your settings as appropriate, such as the resolution and destination options, and click Preview to preview your images.
- Epson Scan displays the previewed images in a separate preview window on your screen. Here, you can check the image and adjust your settings as appropriate. When you use the Thumbnail preview, Epson Scan automatically creates marquees around your image(s) for you.
- A marquee is a moving dotted line that appears on the edges of your preview images to indicate the scan area. When you scan your image(s), only the area within the marquee is captured and saved as your final image.
If you need to adjust a marquee, click inside it and click the
 delete marquee icon. Then select the Normal preview mode and preview the scanner bed again - this will allow you to select and adjust the scan area yourself.
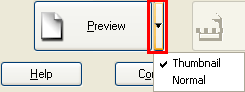

- Once you have finished previewing your images, click Scan to save the image(s).
For more information on scanning images and selecting scan settings, see your user's guide for help.
Epson Scan 2
- Open Epson Scan 2 and select Photo Mode.

- Select Transparency Unit from the Document Source and choose the relevant Document Type.

- Click the Thumbnail Options button and select the correct size from the Medium Format Film Size list.

If necessary, you can also adjust the amount of clipping that occurs in Thumbnail mode by changing the Cropped Area Size setting.
- Epson Scan 2 displays the previewed images to the side of the settings screen. Here, you can check the image and adjust your settings as appropriate. You can select the Thumbnail option at the top of the preview.

When you use the Thumbnail preview, Epson Scan 2 automatically creates marquees around your image(s) for you.
- A marquee is a moving dotted line that appears on the edges of your preview images to indicate the scan area. When you scan your image(s), only the area within the marquee is captured and saved as your final image.
If you need to adjust a marquee, click inside it and click the
 delete marquee icon. Then un-tick the Thumbnails option and preview the scanner bed again - this will allow you to select and adjust the scan area yourself.
 - Once you have finished previewing your images, click Scan to save the image(s).
For more information on scanning images and selecting scan settings, see your user's guide for help.