How to fully uninstall a All-In-One from Windows 10
- I want to update to the latest driver and need to uninstall the current driver before doing so
- I need to fully remove the printer and driver for my Epson printer on Windows 10
If you need to fully remove the Epson printer driver and associated files from Windows 10, please follow the instructions below.
This procedure does not apply to products using an inbox driver. If you are unsure of which type of driver you have installed then refer to Epson and Windows 10 for guidance.
|
This procedure is more in-depth than the standard method of uninstalling and will remove all currently installed Epson printers. Important: This article assumes that your printer is operational (e.g. displaying no errors) and addresses the full uninstall process only. |
Follow the steps below to fully uninstall the printer driver from Windows 10. This procedure does not apply to products using an inbox driver. If you are unsure of which type of driver you have installed then refer to Epson and Windows 10 for guidance.
Open the Devices and Printers folder and clear all documents from the print queue.
|
If you have more than one icon for your Epson printer model(s), repeat this procedure for any duplicate drivers. However, be aware that Windows 10 has a feature called port stacking. This means if one or more printer drivers are using the same virtual printer port, Windows will stack the printers as a list when you right-click on the printer icon, but only one icon will be displayed.
For detailed instructions on this step, refer to How to check the driver and print queue status in Windows. |
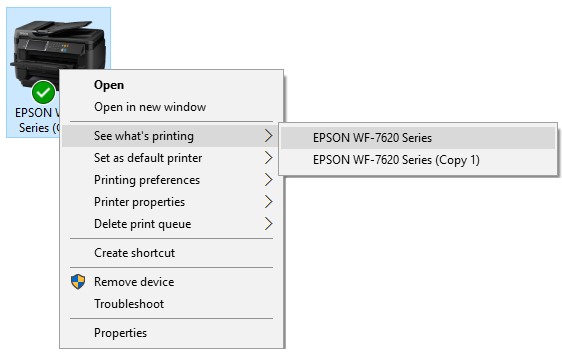
- Open the Devices and Printers folder. For guidance refer to article How to open the Devices and Printers folder in Windows
- Right-click on the Epson printer, and then left-click on See What’s Printing to open the print queue.
- If there are documents waiting in the print queue, click Printer then Cancel All Documents.
- Click Yes when prompted “Are you sure you want to cancel all documents for ‘Epson xxxx’?”.
- If you have had to cancel documents, restart the computer before moving on to the next step. To restart the computer, move the mouse cursor to the bottom or top-right of the screen and click
 Settings. Click Power and then Restart.
Uninstall the printer driver from Programs and Features
- Power off the printer and if present disconnect the USB or Ethernet cable.
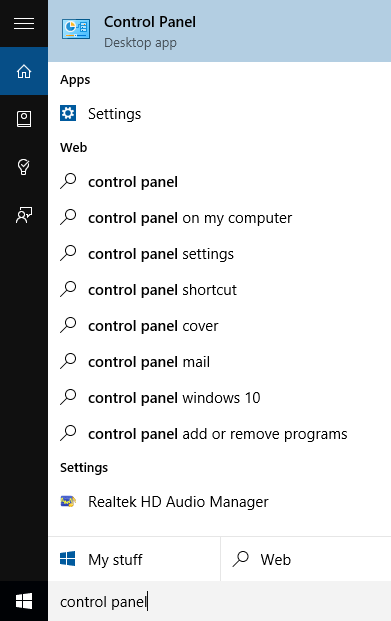
- Move the mouse cursor to the bottom left of the screen and click the
 Start button.
 - Type Control panel in the Search bar and press Enter.
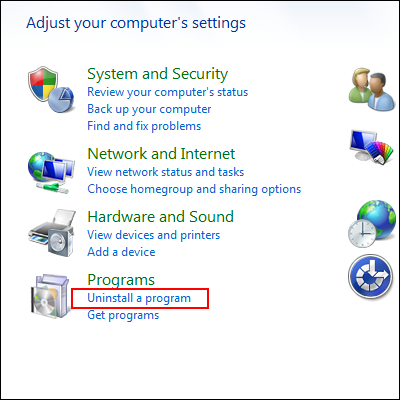
- Left-click Uninstall a program. (If Uninstall a program is not listed, look for and select Programs and Features instead.)
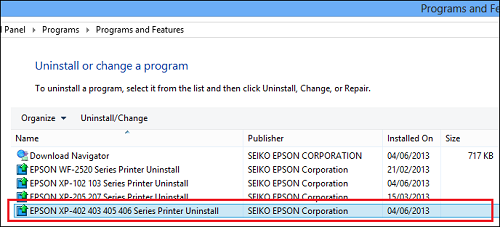
- Locate and double-click on the uninstall option for your printer model, e.g. EPSON XP-402 Series Printer Uninstall. (There will be no file size in the Size column, this is normal.)
- Click Continue if you receive a Windows permission request to "Uninstall or change an application".
- The EPSON Printer Utility window will appear.
- Click on the Epson printer icon that corresponds to the printer you wish to uninstall and click OK.
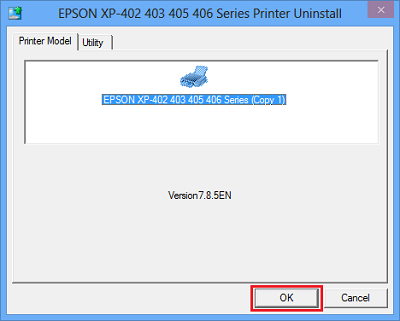
- Answer Yes to all prompts to complete the uninstall process.
- Click OK to the "Uninstall complete" notification.
- Repeat this procedure until all Epson printer drivers are uninstalled.
- Once complete, you may wish to remove any EPSON software that was bundled with your printer, e.g. EPSON File Manager or EPSON Easy Photo Print.
- Once the uninstall process has finished, close the Programs and Features window.
Browse to the inf folder using Windows Explorer or Computer
- Open Windows Explorer or Computer.
- Navigate to the drive that Windows is installed on (usually C:).
- Open the windows folder.
- Open the inf folder.
You will now need to search for the Epson 'oem' files in the Windows inf folder
- Locate the files labelled OEMxx.inf (where xx is a number from 0, 1, 2, etc. upwards). The oem files you locate may not display the .inf extension.
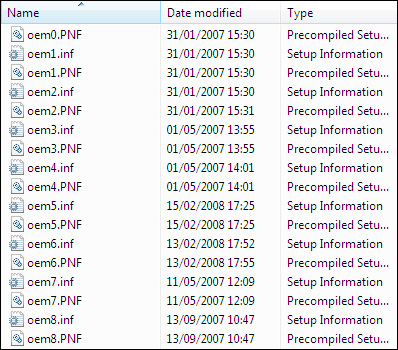
- There are normally two oem files that share the same number. For example with oem0 there would normally be
oem0.inf
 and oem0.PNF file:
- Start with the first oem.inf file (usually oem0.inf).
 Note:
Note:You cannot open a .PNF file.
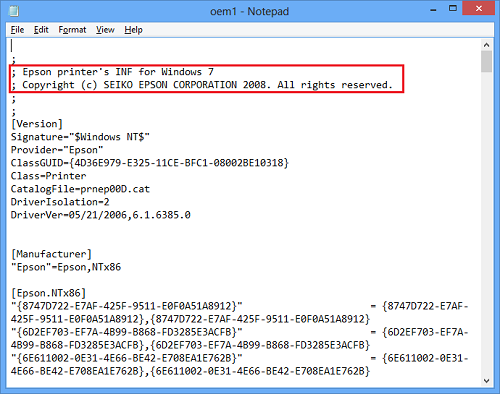
- Double-click on the file and it will open in the Notepad program.
- Check for "SEIKO EPSON" or "EPSON" within the first few lines of text.
- If it does not say "SEIKO EPSON" or "EPSON" within the first few lines, close the file and check the next oem file. To close a file, click on the
 Close icon found in the top-right of the program window.
 Caution:
You must not edit any OEM files.
- If "SEIKO EPSON" is listed within the first few lines and the printer details are listed further down, close and delete the file. To delete it, right-click on the file icon then left-click on Delete from the menu.
Caution:
You must not delete any OEMxx files that do not contain "SEIKO EPSON".
- Click Yes to the "Confirm Delete" prompt, to send the file to the Recycle Bin. Then delete its corresponding oem.pnf file.
In the example below, oem1.inf is a SEIKO EPSON file. This should be deleted along with oem1.PNF.
- Continue to check each OEMxx.inf file in turn, following the procedure above.
- Once all OEMxx.inf files have been checked, close the inf folder.
Stop the Print Spooler service in Local Services
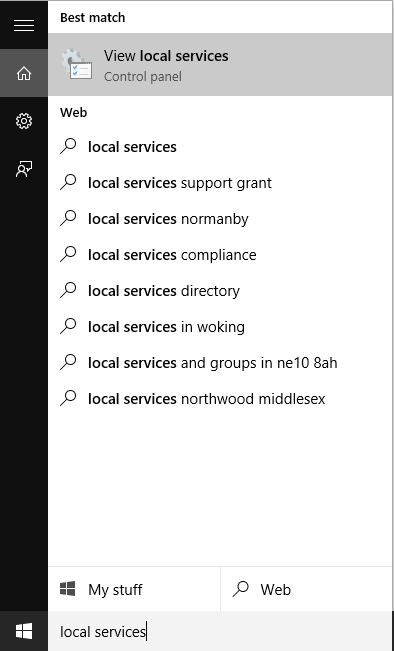
- Move the mouse cursor to the bottom left of the screen and click the Start icon.
- Type Local Services in the Search bar and click on View local services.
- Click Continue if the Windows User Account Control asks your permission to continue.
- This will open the Local Services window.
- Scroll down the list of services until you find the Print Spooler.
- Click on Print Spooler to highlight it.
- At the top-left of the window, click on Stop the service. Windows will attempt to stop the service.
- Once the Print Spooler service has stopped, close the window.
- For a full guide, see How to Stop and Restart the Print Spooler Service in Windows
Remove the Epson files from the w32x86 folder (Windows 10 32-bit) and/or the x64 folder (Windows 10 64-bit)
- Open Windows Explorer or Computer.
- Navigate to the drive that Windows is installed on (usually C:).
- Open the windows folder.
- From here, browse to: \system32\spool\drivers.
- In the drivers folder you should find the folders Color and w32x86. (Windows 64-bit users: you may also find a x64 folder.)
- Right-click on the w32x86 folder and left-click Delete, do the same again if you have a x64 folder, as both may contain files regarding your Epson printer.
|
Deleting the w32x86 and the x64 folders will remove all installed printer drivers so these will need to be reinstalled. If you have non-Epson printers installed and do not wish to reinstall them, do the following:
|
Once deleted, restart the computer. This should also restart the Print Spooler
- Once restarted, check that the Print Spooler service is running.
- Open Local Services.
- With Print Spooler highlighted, click on Start the service.
- If Start is not listed but Restart is, click on Restart the service.
- Windows will attempt to start the service.
- Once the Print Spooler status is "Started", close the window. For a full guide, see How to Stop and Restart the Print Spooler Service in Windows
- Make sure that your printer is still powered off and disconnected from the computer. The Epson printer driver is now uninstalled.
If you need to reinstall the printer driver, do so using the drivers from the Epson Support website.